Last month, I took a cloud computing course in AWS and then successfully passed the AWS Certified Cloud Practitioner certification. During this learning journey, I covered many cloud services in AWS, among which was Amazon s3(Simple Storage Service). That’s why I wrote this article which describes in detail how to upload files to an S3 bucket with NodeJS and Typescript.
Before starting, it would be better to introduce Amazon S3 and present the tools we will use during our learning journey.
Amazon Simple Storage Service(Amazon S3) is a service offered by AWS that’s a scalable, high-speed, web-based storage service. This service is designed for online backup and archiving of data and applications on AWS. As tools that we used the develop this service, we have:
- AWS SDK
- Multer
- Express
- TypeScript (I like it 😉)
A brief description of our service is that it allows exclusively uploading image files (jpg, png, jpeg) to an Amazon S3 bucket provided.
Create a NodeJS project with TypeScript
Here we will build a nodeJS project firstly and secondly add TypeScript within.
Setup a NodeJs project
Initialize the project
$ npm init
Configuring runtime
We will use the following dependencies
ts-node: It allows executing TypeScript files directly without precompiling.
nodemon: it will help us to automatically restart our service after file changes in a given directory are detected, and our is the /src directory.
$ npm i ts-node nodemon --save-dev
create a /nodemon.json file in the root of your project with this code within
1
2
3
4
5
6
{
"watch": ["src"],
"ext": ".ts,.js",
"ignore": [],
"exec": "ts-node ./src/index.ts"
}
Add dependencies
We need some dependencies like express, dotenv, multer, cors, and aws-sdk
$ npm i express dotenv multer cors aws-sdk
Add TypeScript
At this level, we will install Typescript then configure the compiler. Install TypeScript, and dependencies
$ npm i @types/cors @types/express @types/multer @types/node typescript --save-dev
Configuring the TypeScript Compiler
Add /tsconfig.json file with the configs below:
1
2
3
4
5
6
7
8
9
10
11
12
13
14
{
"compilerOptions": {
"target": "es5",
"module": "commonjs",
"lib": ["es6"],
"allowJs": true,
"rootDir": "./src",
 "outDir": "./build",
"strict": true,
"noImplicitAny": true,
"esModuleInterop": true,
"resolveJsonModule": true
}
}
A quick explanation of the content is that all ts files in the /src directory will be compiled to js file into a /build directory, and about the rest of the configs, check the doc here 😌.
Add node commands and environment variables
Here we will add some custom node commands to our /package.json file. It should look like this:
1
2
3
4
5
6
7
8
9
10
11
12
13
14
15
16
17
18
19
20
21
22
23
24
25
26
27
28
29
{
"name": "upload-s3-servie",
"version": "1.0.0",
"description": "upload file to s3 bucket",
"main": "build/index",
"scripts": {
"start": "nodemon",
"build": "rm -r ./build && tsc",
"test": "echo \"Error: no test specified\" && exit 1"
},
"author": "Ismael Messa",
"license": "ISC",
"devDependencies": {
"@types/cors": "^2.8.12",
"@types/express": "^4.17.13",
"@types/multer": "^1.4.7",
"@types/node": "^17.0.21",
 "nodemon": "^2.0.15",
"ts-node": "^10.7.0",
"typescript": "^4.6.2"
},
"dependencies": {
"aws-sdk": "^2.1095.0",
"cors": "^2.8.5",
"dotenv": "^16.0.0",
"express": "^4.17.3",
"multer": "^1.4.4"
}
}
as you can see, we have two custom commands:
npm start: to run our service locally.
npm run build: to build our service into the /build directory for production.
Then add the .env file with the following variables:
1
2
3
4
PORT=8080
AWS_ACCESS_KEY_ID=xxxxxxxxxxxx
AWS_SECRET_ACCESS_KEY=xxxxxxxxxxxxxxxxxxxxxxxxxxxxxxxxxxxx
BUCKET_NAME=bucket_name
About AWS_ACCESS_KEY_ID and AWS_SECRET_ACCESS_KEY, you should have an AWS account. The best practice is to create a new IAM User and give it a permission policy (fullAccessS3) according to the task you want to perform and get the keys in the CSV file.
Implement a config file to manage env variables
/src/config/index.ts
1
2
3
4
5
6
7
8
9
10
11
12
13
14
15
16
17
18
19
20
import \* as dotenv from 'dotenv';

dotenv.config();

/\*\*

- Config file
  \*/
  export const config: {
  port: number,
  aws_access_key_id: string,
  aws_secret_access_key:string,
  bucket_name: string
  } = {
  port : Number(process.env.PORT) ?? 8080,
  aws_access_key_id : process.env.AWS_ACCESS_KEY_ID ?? " ",
  aws_secret_access_key : process.env.AWS_SECRET_ACCESS_KEY ?? '',
  bucket_name: process.env.BUCKET_NAME ?? 'test-bucket'
  }
Implement S3 services
After making this lot of configs, it’s time to go ahead into the TypeScript code 😎. Yeah! There are three s3 services that we should implement :
- checkBucket: It’s a function that checks if the bucket with the current name has already existed in Amazon S3.
/src/services/checkBucket.ts
1
2
3
4
5
6
7
8
9
10
11
12
13
14
15
16
17
18
19
20
21
22
23
24
import { S3 } from "aws-sdk";
/\*\*

- @name checkBucket
- @param {S3} s3
- @returns {Promise<{success:boolean; message: string; data:string;}>}
  \*/
  export const checkBucket = async (s3: S3, bucket:string) => {
  try {
  const res = await s3.headBucket({Bucket: bucket}).promise()

      console.log("Bucket already Exist", res.$response.data);

      return { success: true, message: "Bucket already Exist",data: {}};

  } catch (error) {

      console.log("Error bucket don't exsit", error);

      return { success: false, message: "Error bucket don't exsit",data: error };

  }
  };
- createBucket: It’s also a function, but this one creates a bucket in Amazon S3 with the name provided in
.envfile in a specific region.
/src/services/createBucket.ts
1
2
3
4
5
6
7
8
9
10
11
12
13
14
15
16
17
18
19
20
21
22
23
24
25
26
27
28
29
30
31
32
33
34
import { S3 } from 'aws-sdk';
import { CreateBucketRequest } from 'aws-sdk/clients/s3';

import config from "../config";

/\*\*

- @name createBucket
- @param {S3} s3
- @returns {Promise<{success:boolean; message: string; data: string;}>}
  \*/
  export const createBucket = async (s3: S3) => {

const params: CreateBucketRequest = { Bucket: config.bucket_name,
CreateBucketConfiguration: {
// Set your region here
LocationConstraint: "ap-south-1"
}
}

try {
const res = await s3.createBucket(params).promise();

    console.log("Bucket Created Successfull", res.Location);

    return {success: true, message: "Bucket Created Successfull",data: res.Location};

} catch (error) {
console.log("Error: Unable to create bucket \n", error);

    return {success: false, message: "Unable to create bucket", data: error};;

}
}
- uploadToS3: That is the core function because the project logic is implemented there (uploading files to Amazon S3🧐).
/src/services/uploadToS3.ts
1
2
3
4
5
6
7
8
9
10
11
12
13
14
15
16
17
18
19
20
21
22
23
24
25
26
27
28
29
30
31
32
33
34
35
36
37
import { S3 } from "aws-sdk";
import fs from 'fs';

import config from "../config";

/\*\*

- @name uploadToS3
- @param {S3} s3
- @param {File} fileData
- @returns {Promise<{success:boolean; message: string; data: object;}>}
  \*/
  export const uploadToS3 = async (s3: S3, fileData?: Express.Multer.File) => {
  try {
  const fileContent = fs.readFileSync(fileData!.path);

      const params = {
        Bucket: config.bucket_name,
        Key: fileData!.originalname,
        Body: fileContent
      };

      try {
        const res = await s3.upload(params).promise();

        console.log("File Uploaded with Successfull", res.Location);

        return {success: true, message: "File Uploaded with Successfull", data: res.Location};
      } catch (error) {
        return {success: false, message: "Unable to Upload the file", data: error};
      }

  } catch (error) {
  return {success:false, message: "Unalbe to access this file", data: {}};
  }
  }
Implement the controller
Before implementing the controller, we need a function that initializes the bucket.
This function must before creating a bucket check if it exists.
/src/services/index.ts
1
2
3
4
5
6
7
8
9
10
11
12
13
14
15
16
17
18
19
20
import { S3 } from 'aws-sdk';

import checkBucket from './checkBucket';
import createBucket from './createBucket';

import config from "../config";

/\*\*

- @name initBucket
- @returns {void}
  \*/
  export const initBucket = async (s3: S3) => {
  const bucketStatus = await checkBucket(s3, config.bucket_name);

if( !bucketStatus.success ) { // check if the bucket don't exist
let bucket = await createBucket(s3); // create new bucket
console.log(bucket.message);
}
}
Yes! Now we can pass to the controller implementation, and with this part above, it will be pretty easy.
/src/controllers/index.ts
1
2
3
4
5
6
7
8
9
10
11
12
13
14
15
16
17
18
19
20
21
22
23
24
25
26
27
28
29
30
31
import initBucket from "../services";
import { S3 } from 'aws-sdk';
import { Request } from "express";

import { uploadToS3 } from "../services/uploadToS3";
import config from "../config";

export class UploadController {
static Upload = async (req: Request, res: any) => {

    const s3 = new S3({
      accessKeyId: config.aws_access_key_id,
      secretAccessKey: config.aws_secret_access_key,
    });

    // Initialize bucket
    await initBucket(s3);

    // get file data through req.file thank to multer
    console.log("file stobject", req.file)

    const uplaodRes = await uploadToS3(s3, req.file);

    if (uplaodRes.success) {
      res.status(200).json(uplaodRes);
    } else {
      res.status(400).json(uplaodRes);
    }

}
}
Implement the Route
It’s here that multer intervenes, which is a node.js middleware for handling multipart/form-data , used primarily for uploading files. It is written on top of busboy for maximum efficiency.
Config multer storage and fileFilter
1
2
3
4
5
6
7
8
9
10
11
12
13
14
15
16
17
18
19
20
import { Request } from "express";
import multer, { FileFilterCallback } from "multer";

type FileNameCallback = (error: Error | null, filename: string) => void

export const multerConfig = {
storage : multer.diskStorage({
destination: 'uploads/',
filename: function (req: Request, file: Express.Multer.File, cb: FileNameCallback) {
cb(null, file.originalname);
}
}),

fileFilter :(req: Request, file: Express.Multer.File, cb: FileFilterCallback) => {
if (file.mimetype === "image/jpeg" || file.mimetype === "image/png" || file.mimetype === "image/jpg") {
return cb(null, false);
}
cb(null, true);
}
}
now we can implement the route with the multer middleware.
/src/routes/index.ts
1
2
3
4
5
6
7
8
9
10
11
12
13
import express from 'express';
import multer from 'multer';

import { UploadController } from '../controllers';
import { multerConfig } from '../config/multerConfig';

const router = express.Router();

const upload = multer(multerConfig.fileFilter);

router.post("/upload", upload.single('uploaded_file'), UploadController.Upload);

export { router };
Create a server with Express
/src/index.ts
1
2
3
4
5
6
7
8
9
10
11
12
13
14
15
16
17
18
19
20
21
22
23
24
25
26
27
28
29
30
import express from "express";
import cors from "cors";

import { router as Router } from "./routes"
import config from "./config";

const app = express();

const port = config.port;

const router = express.Router();

app.use(cors()); // Enable all cors requests for all routes

app.use(express.urlencoded({ limit: '50000mb', extended: false }));
// user route for all path

app.use(Router);

app.get("/", (req, res) => {
res.status(200).json({success: true,message: 'Upload S3 Service is ready'});
});

app.get("\*", (req, res) => {
res.status(404).send("Resource Not Found");
});

app.listen(port, () => {
console.log(`Server is listening on port${port}\nYou can access via http://localhost:${port}/`);
});
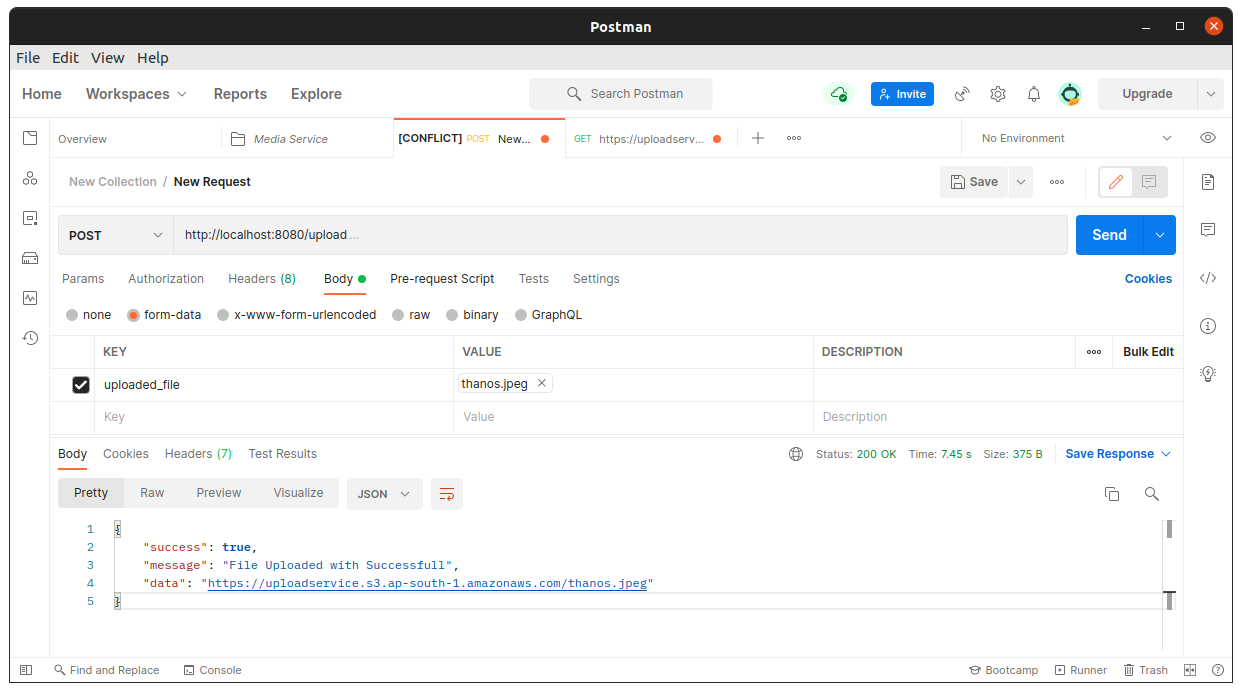
Test the API with PostMan
Launch the service with the following command
$ npm start
After getting the Endpoint from the console, paste it into Postman and provide your file as data like this:
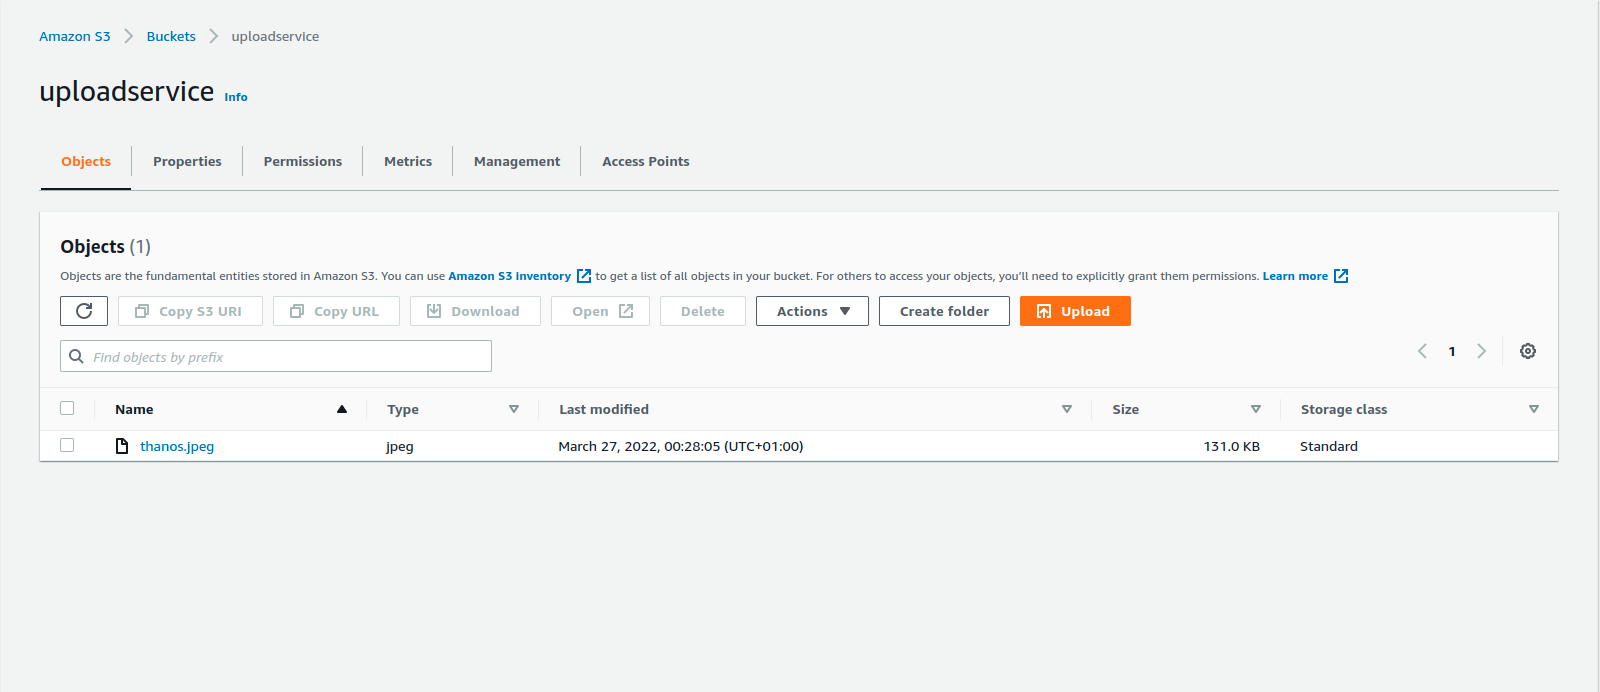
and to Amazon S3 you should see the currently uploaded file in the specific bucket name for me is uploadservice:
Conclusion
I hope this article has helped you!
The source code is available in this repository on GitHub.